Sometimes, as producers, we need something to spark our creative juices before the ideas start flowing into the music. Many will use samples and/or loops to help generate inspiration.
But what about producers who want to still keep their tracks 100% original? Well, that’s where FL Studio’s Riff Machine comes in.

Riff Machine will allow you to manipulate your midi in real-time by altering your chords and melodies. This will allow you to start with a simple chord progression or even a single midi note, and come up with melodic variations that can help spark new ideas for your project. However, if you wanted to, you could even let Riff Machine come up with ideas on its own as well. Go to the TOOLS from the main menu and select Riff Machine. This will automatically load up an instance of Sytrus for you as your instrument, but you can switch this out with another VSTi afterward. You will want to deselect “Work on Existing Score” if you’re starting from scratch. If you already have some midi notes, select the channel with the midi, go to the piano roll and hit ALT+E to bring up Riff Machine. You’ll see that “Work on Existing Score” is selected and you can immediately start manipulating your notes.
One thing I recommend doing first is going to the very last tab labeled “Fit” and selecting the scale you want to work in.
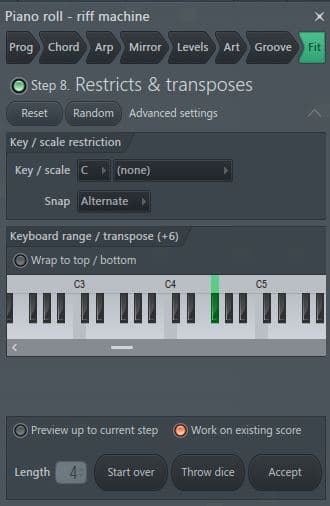
Simply select the key and scale (major, minor, etc.) and you should be good to go. This way, the melodies and chords Riff Machine comes up with will make more sense and can match any music you’ve already laid down in your other channels.
One thing you’ll notice at the very bottom of Riff Machine is the “Throw Dice” option. This will randomize all of the settings, which might be something you want to experiment with. Still, I recommend that after doing so, you go back into the “Fit” tab and reselect the scale you’re wanting to work with to keep things in line with what notes you’re wanting to work with. However, inside each tab, there is a “Randomize” button that will alter the settings only inside of that specific tab that you’ve selected. This is incredibly helpful to quickly generate ideas and learn what each tab is capable of.
In the Prog, Chord, Arp and Groove tabs, you’ll notice a preset folder with a dropdown menu to the right of it.
![]()

Use the dropdown menu to quickly go through suggested presets. However, if you click the folder icon or the preset name, this will take you into the preset browser. One trick you can do to get even more presets out of Riff Machine is to select presets from within the “Scores” folder, specifically Arpeggiator, Chopping, and Quantization. Inside the Chopping folder, you’ll notice it has the main folders for the Riff Machine tabs presets.

Feel free to use presets from the other folders inside the tab you’re currently working with to achieve even more variety. You’ll come up with quick ideas you might not have imagined inputting yourself, with or without a midi controller.
In the Prog and Chord tabs, you’ll also notice a section labeled “Options.”

This section allows you to further manipulate the midi to better fit your project. “Time mul” will increase or decrease the level of overall midi variation. The levels section is identical to the “Levels” tab and will adjust panning, velocity, note release, mod x (filter cutoff), mod y (filter resonance) and pitch. Mod X/Y will rely heavily on your channel settings filtering section and will alter the sound depending on which filter type you select. Overall, I suggest using the Levels tab instead to adjust these settings to hear a more dramatic effect.
The names of each of these tabs are labeled quite well, as they manipulate exactly what they say, but in case the “Prog” tab confuses you, it is for melody progressions. The “Mirror” tab simply flips the midi progression from the halfway point left to right or the note selection from top to bottom. The “Art” tab will manipulate the note lengths and the spacing between the notes. The “Groove” tab manipulates the swing/timing of the notes.
Overall, I would say that simply going through the different preset folders will be the quickest way to get a feel for what Riff Machine can do for your creativity. I find the most effective way to use it would be to pull up a piano or keys of your choice and choose a scale to start with. The reason I use keys or a synth that plays like a piano is that these sounds have a nice attack and long enough release to get a full range of sound from the midi manipulation, which in return can help you spark more musical ideas that can be applied to almost any other sound. Usually, just adding one instance of Riff Machine will be enough to stop your beat block and get you to start building more tracks around that single sound. Even with what Riff Machine comes up with from your midi notes, you can always manipulate these notes even more by manually going into the piano roll afterward and moving the notes around yourself. This is a great way to avoid having to use someone else’s loops or samples in your music.
If you want to see some real-life examples of me using Riff Machine, check out this FL Studio Riff Machine Tutorial video.