Ever wish you could control FL Studio with a mobile device? Image-line Remote is a free app that does exactly that. It gives your mobile device the ability to use it as a MIDI controller. So if you ever wished you have a drum pad controller, MIDI keyboard, or wanted to use your mixer without a mouse, IL Remote does all of that and much more.
To get started, download the app from your app store onto your IOS or Android phone or tablet. Make sure your computer and device are connected to the same Wi-Fi network. Inside FL Studio, go to Options, MIDI tab and on the bottom right of the screen you’ll see the option to “Enable Image-Line Remote.”


Now when you open the app on your mobile device, select “Tap To Connect” on the left side of the screen. You’ll then see the Wi-Fi icon in the app change color from orange to green. If not, you’ll want to disable FL Studio from any firewall you have on your computer. Any device you have connected with IL Remote will appear in your list of MIDI Inputs. Simply highlight your device and click Enable. In the image above, I have both my iPhone and iPad enabled.

When you open the app, you’ll be greeted with the MAIN tab screen shown above. This gives you the controls to your transport and main toolbar in FL Studio. You can do everything from record to switching between your main windows to switching between patterns. Pretty much everything you’d expect from a dedicated FL Studio MIDI controller.

In the next tab, PIANO, you have control over the keys while keeping the main transport controls to play and record your tracks. A great feature with IL Remote is the ability to edit the size of any of these options including the keys. Drag your finger from the top right of the screen to the left and you’ll open the editor.

You’ll have the ability to add or delete tabs/pages, create new controls and edit. In the image above, you can see the keyboard options that allow you to change the MIDI channel input and even highlight specific scales for you by coloring the notes outside of the scale red. You can increase or decrease the size of the keyboard and other controls by dragging from the bottom right of the control.

In the next tab, you have a dedicated drum controller for the FPC. When you load FPC in FL Studio, everything in IL Remote’s FPC will automatically be mapped to the default settings in FL Studio. Keep in mind you can remap any of these pads using the MIDI note mapping feature on your computer’s FPC. Select that option and you’ll map those pads to any pad you select on your IL Remote. Check out my FPC blog post to learn more about that and other features in FPC.

The HARMO tab is a grid-based MIDI controller that helps you play notes in specific scales in the form of note pads on a grid. This actually might be easier to play than the keyboard on IL Remote, especially for those who don’t traditionally use a keyboard to input MIDI notes. All of the green pads are the octaves of the scale you’re in. All other notes shown are in the selected scale you’re in. By default, C Major is selected. You also select Chromatic Mode at the bottom of the menu on the right to show all of the notes available. It will gray out the notes outside of the selected scale.

In the next tab, you’re given 16 pads that are linked to your Slicex plugin in FL Studio. Slicex is a sampler based plugin that allows you to chop samples and play the slices back in any order you like. The plugin itself has a lot more control over the individual slices, but IL Remote is a simple way to play and record them.

Next is the Performance tab that gives you control over the FL Studio playlist when it’s in performance mode. This allows you to launch playlist clips that will loop based on your input. This is perfect for anyone who has a finished track that wants to perform the parts live by selecting specific elements to play perfectly in sync with each other. You can select clips individually or create “scenes” to launch multiple clips simultaneously.

Using any of the controls in combination with Grossbeat would make for a pretty versatile performance. Grossbeat is a plugin that allows for repeating, reversing, timing and pitching effects to your audio signal. IL Remote has these pads automatically linked to the most common presets used in Grossbeat. This can liven up any normal performance by manually adding in glitch-like effects at a moment’s notice.
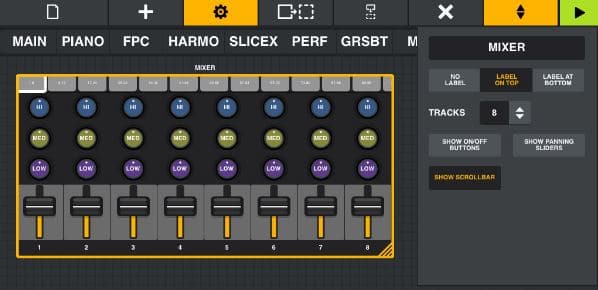
Finally, in the final tab, we have the Mixer controls. The image above is a reminder that you can always edit the controls to match your personal requirements. But overall, this will generally give you basic control over the volume, panning and the track post-fader EQ. For any additional controls over specific plugins, you’ll want to create new controls and link them to your plugin with the “Link To Controller” feature in FL Studio.
Hopefully, this gives you some options in terms of MIDI control if you don’t have any hardware controllers available to you. This can even act as a supplement controller to any controllers you already have by adding a drum pad to your keyboard controller or having transport controls at your fingertips instead of using a mouse. Little things like that can save you time and even inspire more creativity in your workflow with IL Remote.